 By
By 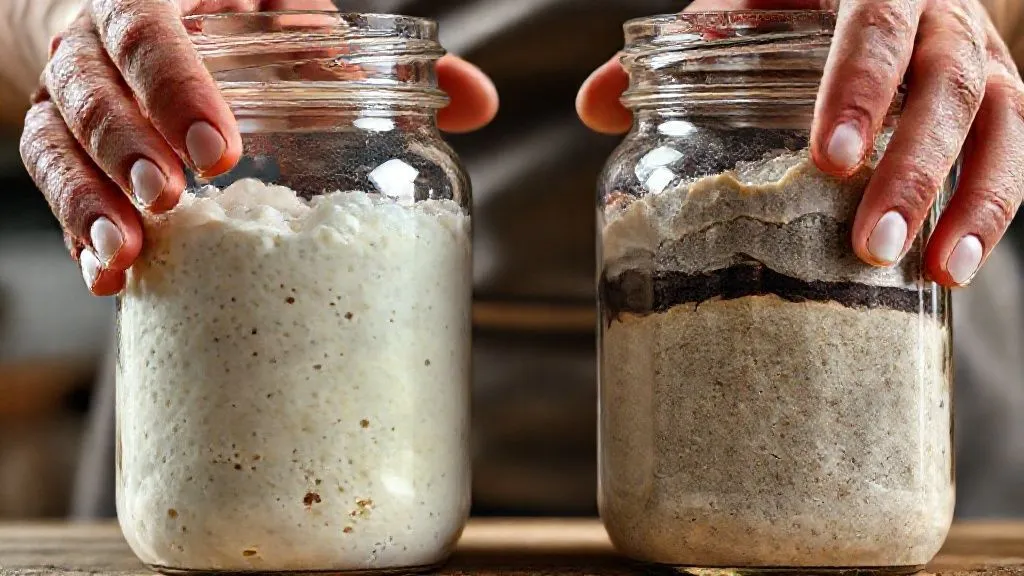
How to Prevent Sourdough Starter from Becoming Overly Acidic?
For over 15 years in the world of artisan bread, I've seen countless home bakers, and even some professionals, struggle with a common but often misunderstood challenge: an overly acidic sourdough starter. It's a problem that can turn the dream of a perfect loaf into a dense, sour disappointment, leaving many feeling frustrated and questioning their baking prowess.
The tell-tale signs are usually obvious: a starter that smells overwhelmingly of vinegar or nail polish remover, a sluggish rise, and a resulting bread with an unpleasantly sharp, one-dimensional sourness. This isn't the complex, nuanced tang we all crave; it's a sign of an imbalanced microbial ecosystem, a culture pushed too far to one extreme.
But don't despair! Through years of trial, error, and deep dives into the science of fermentation, I've developed and refined a set of actionable strategies. In this definitive guide, I'll share my expert insights and practical frameworks to help you understand, prevent, and even rescue your sourdough starter from becoming overly acidic, ensuring a vibrant, happy culture and consistently delicious bread.
Understanding the Root Cause: Why Starters Turn Acidic
Before we can prevent a problem, we must understand its origins. The delicate ecosystem within your sourdough starter is a fascinating world, a battleground of sorts, where yeast and various strains of lactic acid bacteria (LAB) coexist and compete. The acidity of your starter is largely a byproduct of these LAB, which convert sugars into lactic and acetic acids.
The Microbe Ecosystem: Lactobacilli vs. Yeast
A healthy starter maintains a symbiotic relationship between yeast and LAB. Yeast produces carbon dioxide, giving your bread its rise, while LAB contribute to flavor and help protect the starter from spoilage. However, when certain conditions favor the rapid proliferation of specific LAB strains, particularly those that produce more acetic acid, or when the feeding schedule is off, the balance tips, leading to excessive acidity.
Factors Influencing Acidity
Several environmental and maintenance factors directly impact this microbial balance and, consequently, your starter's pH:
- Temperature: Warmer temperatures generally accelerate fermentation and can favor acetic acid production.
- Feeding Ratio: The proportion of starter, flour, and water dramatically affects how quickly the food supply is depleted.
- Feeding Frequency: How often you feed your starter directly impacts its hunger levels and the accumulation of acidic byproducts.
- Hydration: Thicker starters (lower hydration) tend to favor acetic acid production more than lactic acid.
- Flour Type: Whole grain flours, with their higher nutrient content, can lead to faster and more complex fermentation, sometimes pushing towards acidity if not managed.
"The secret to a balanced sourdough starter isn't just about feeding it; it's about creating the optimal environment where its diverse microbial community can thrive in harmony, preventing any single group from dominating the flavor profile." - An Experienced Baker's Insight

Strategy 1: The Goldilocks Zone of Temperature Management
Temperature is, in my experience, one of the most overlooked yet critical factors in controlling starter acidity. Just as Goldilocks sought the 'just right' porridge, your starter thrives in a specific temperature range that encourages a balanced microbial activity, rather than favoring the acid-producing bacteria.
Warmer temperatures (above 26°C or 79°F) tend to accelerate the metabolism of lactic acid bacteria, potentially leading to a faster accumulation of acids and a more sour starter. Conversely, very cool temperatures (below 20°C or 68°F) can slow down both yeast and LAB, but if prolonged, can also lead to an overly acidic environment as the starter slowly consumes its food over a longer period.
Ideal Temperature Ranges for Balance:
- For active feeding: Aim for 22-24°C (72-75°F). This range generally promotes a good balance between yeast activity and lactic acid production.
- For slowing down fermentation (e.g., overnight): A slightly cooler spot, around 18-20°C (64-68°F), can extend the feeding window without over-souring.
- For long-term storage (refrigeration): 4-7°C (40-45°F) drastically slows down all activity, allowing for less frequent feeding.
Actionable Steps for Temperature Control:
- Use a Thermometer: Keep a small kitchen thermometer near your starter. Knowing the ambient temperature is crucial for making informed feeding decisions.
- Find a 'Sweet Spot': Identify warmer and cooler spots in your kitchen. Areas near appliances or sunny windows can be warmer, while a pantry or basement might be cooler.
- Utilize a Proofing Box/Oven with Light: For precise control, a proofing box or even an oven with just the light on (check temperature with a thermometer!) can provide a stable, ideal environment.
- Adjust Feeding Schedule: If your environment is consistently warm, you'll need to feed more frequently or use a higher feeding ratio (see Strategy 2) to prevent over-fermentation and acidity.

Strategy 2: Optimizing Your Feeding Ratios for Balance
The ratio of starter to fresh flour and water you use during feeding is perhaps the most powerful lever you have to control acidity. Many beginners are taught the 1:1:1 ratio (equal parts starter, flour, water by weight), which is a great starting point, but it's not always optimal for preventing an overly acidic starter.
The 1:1:1 Myth vs. Strategic Feeding
A 1:1:1 ratio means you're introducing a relatively large amount of existing, active starter into a smaller amount of fresh food. This can lead to the starter consuming its new food supply very quickly, reaching peak activity, and then quickly becoming hungry and acidic if not fed again promptly. To mitigate acidity, we often need to 'dilute' the existing starter's acidity and provide a larger buffer of fresh food.
Actionable Steps for Optimizing Ratios:
- Increase the Flour and Water: Instead of 1:1:1, try a 1:2:2 or even 1:3:3 ratio (starter:flour:water). This means for every 1 part of your existing starter, you add 2 or 3 parts fresh flour and 2 or 3 parts fresh water.
- Why Higher Ratios Work: By increasing the fresh food relative to the starter, you effectively 'dilute' the existing acidic environment and provide a larger buffet for the microbes. This extends the fermentation time before the starter becomes hungry, giving you a longer window before acidity builds up.
- Experiment and Observe: Start with 1:2:2. If your starter still seems to get overly acidic quickly, try 1:3:3. Observe how long it takes to peak and how it smells.
- Adjust for Storage: If you're putting your starter in the fridge, a 1:4:4 or even 1:5:5 ratio can be beneficial, as it provides a substantial food reserve for its slow slumber, preventing it from turning into a sour beast during its long rest.
| Ratio (Starter:Flour:Water) | Typical Fermentation Time (24°C) | Acidity Tendency |
|---|---|---|
| 1:1:1 | 4-6 hours | Higher, faster peak |
| 1:2:2 | 6-8 hours | Moderate, slightly slower |
| 1:3:3 | 8-12 hours | Lower, slower fermentation |
Strategy 3: Timing is Everything – When to Feed Your Starter
Feeding your starter at the right time is paramount. An overly acidic starter is often a hungry starter. If you wait too long between feedings, your starter will consume all its available food, deplete its energy reserves, and then begin to produce more acetic acid as it scavenges for nutrients, leading to that sharp, vinegary smell.
Reading Your Starter's Cues
Learning to 'read' your starter is a skill that comes with practice, but there are clear indicators:
- Peak Activity: This is when your starter has roughly doubled or tripled in size, is full of bubbles, and has a pleasant, yeasty, slightly sweet aroma. This is the ideal time to feed or use it.
- Before Collapse: As your starter passes its peak, it will start to deflate, and the bubbles will subside. This is the point where it's getting hungry. If you feed it now, you're still in a good zone.
- After Collapse/Hooch: If your starter has completely deflated and a layer of dark liquid (hooch) has formed on top, it's very hungry and likely becoming acidic. While not always a bad sign, consistently letting it get to this stage will make it overly sour.
Actionable Steps for Timely Feeding:
- Observe the Rise and Fall: After feeding, mark the level of your starter with a rubber band or marker. Note how long it takes to reach its peak. This gives you a baseline for your environment.
- Feed at or Just After Peak: Aim to feed your starter when it's at its peak, or just starting to fall. This keeps the microbial population vibrant and well-fed, preventing the build-up of excessive acids.
- Adjust Frequency: If your starter peaks quickly (e.g., in 4-6 hours), you may need to feed it twice a day. If it's slower (8-12 hours), once a day might suffice.
- Use the Float Test (with caution): A small dollop of starter floating in water indicates it's active and ready. However, don't rely solely on this; visual cues and smell are more reliable for acidity.
Understanding the kinetics of sourdough fermentation can be complex, but observing your starter's behavior is your best guide. For more in-depth scientific insights into microbial activity and fermentation, you can refer to studies on lactic acid bacteria in sourdough.

Strategy 4: The Role of Hydration and Flour Type
Beyond temperature and feeding ratios, the type of flour you use and the hydration level of your starter play significant roles in its acidity. These factors influence the microbial population and the rate at which acids are produced.
Hydration Levels and Fermentation Speed
A thicker, lower-hydration starter (e.g., 70-80% hydration) tends to be more acidic, often favoring the production of acetic acid, which contributes a sharper, more vinegary tang. This is because the microbes operate in a more concentrated environment with less free water. A higher-hydration starter (e.g., 100-120% hydration) is generally more balanced, promoting lactic acid production, which is milder and creamier.
Whole Grains vs. Refined Flours
Whole grain flours (like whole wheat or rye) contain more nutrients, enzymes, and beneficial microbes than refined white flour. While this can lead to a more robust and active starter, it also means faster fermentation and potentially higher acidity if not managed correctly. The bran and germ in whole grains provide additional food for LAB, accelerating their activity.
Actionable Steps for Hydration and Flour:
- Aim for 100% Hydration: For a general-purpose, balanced starter, maintaining a 1:1 flour to water ratio (by weight) is usually best. This provides enough moisture for a balanced microbial environment.
- Adjust for Acidity: If your starter is consistently too acidic, try increasing the hydration slightly (e.g., to 110%) during a few feedings.
- Mix Flour Types: Instead of exclusively feeding with whole wheat or rye, try a blend of flours. My go-to is often 80% unbleached strong bread flour and 20% whole rye flour. This provides nutrients for activity without over-stimulating acid production.
- Consider Organic Flour: Organic flours often have a richer microbial diversity, which can contribute to a more complex and balanced starter.
For a deeper understanding of how different flours impact sourdough fermentation, resources like King Arthur Baking's guide on flour properties offer excellent insights.
Strategy 5: The Power of Dilution and Refreshing Overly Sour Starters
What if your starter is already a sour beast? Don't throw it out! I've rescued countless starters from the brink of extreme acidity. The key here is dilution and a strategic feeding approach to reset its microbial balance.
Emergency Refresh Protocol:
- Discard Heavily: Start by discarding a significant portion of your overly acidic starter. You want to keep only a very small amount, perhaps 10-20 grams. This drastically reduces the existing acidic population.
- Generous Feeding Ratio: Feed this small amount with a much higher ratio of fresh flour and water. I recommend a 1:5:5 or even 1:10:10 ratio (starter:flour:water). This provides a massive influx of fresh food to dilute the acidity and give the yeast a chance to catch up.
- Warm Temperature: Place the newly fed starter in a slightly warmer environment than usual (e.g., 25-26°C or 77-79°F) for its initial rise. This can help encourage yeast activity.
- Repeat if Necessary: If after 12-24 hours it's still overly sour, repeat the heavy discard and generous feeding process. You might need 2-3 cycles to fully 'reset' the starter.
- Observe Closely: Pay close attention to the smell and activity. You're looking for a return to a pleasant, yeasty aroma and good, consistent rise.
Case Study: Reviving 'Sour Sally'
My client, John, had a starter he affectionately called 'Sour Sally' because it always smelled like pure vinegar and produced dense, flat loaves. He was about to give up. We implemented the Emergency Refresh Protocol: he took just 15g of Sally and fed her with 150g flour and 150g water (a 1:10:10 ratio). He kept her at a steady 25°C. After 12 hours, she was bubbly, but still a bit sharp. He repeated the process, taking 15g of the refreshed Sally and feeding her again at 1:10:10. By the second day, Sally had transformed! She smelled sweet and yeasty, had a strong rise, and produced a beautiful, open-crumbed sourdough loaf. This demonstrated that even the most acidic starters can be brought back to life with patience and the right strategy.
Strategy 6: Consistent Maintenance and Observation
Preventing an overly acidic starter isn't a one-time fix; it's an ongoing practice of consistent maintenance and keen observation. Think of your starter as a pet that needs regular, mindful care. Irregular feeding, neglecting to discard, or simply not paying attention to its behavior are common pitfalls that lead to acidity.
Key Observations for a Healthy Starter:
- Aroma: A healthy starter smells yeasty, slightly sweet, with a pleasant tang (like yogurt or fruit). A strong vinegar, acetone, or cheesy smell indicates acidity.
- Texture: It should be bubbly and light when active, becoming stringy when hungry.
- Rise and Fall: Consistent doubling or tripling in size after feeding, followed by a gradual fall, shows good activity.
- Hooch: A small amount of clear hooch is normal if left unfed for a while. Dark, excessive hooch (especially if black or pink) is a sign of extreme hunger and acidity.
Actionable Steps for Consistent Maintenance:
- Establish a Routine: Whether daily, every 12 hours, or every few days from the fridge, establish a consistent feeding routine and stick to it.
- Don't Fear Discarding: Discarding excess starter is essential. It prevents you from having an unmanageable amount and, more importantly, reduces the population of older, more acidic microbes.
- Keep it Clean: Regularly scrape down the sides of your jar and clean it thoroughly every few feedings. This prevents dried starter from contaminating your fresh culture.
- Use a Transparent Jar: A clear glass jar allows you to easily observe the bubbles, rise, and fall of your starter.
As renowned baker Chad Robertson of Tartine Bakery often emphasizes, the relationship with your starter is a continuous learning process. Pay attention, and it will tell you what it needs.
Frequently Asked Questions (FAQ)
Can an overly acidic starter harm my bread? Yes, absolutely. An overly acidic starter can lead to several problems: it can weaken the gluten structure in your dough, resulting in a dense crumb and poor oven spring. The excessive acidity also imparts an unpleasantly sharp, one-dimensional sour flavor to the bread, rather than the complex, nuanced tang you're aiming for. It also makes your starter less active, meaning longer proofing times and less reliable results.
How do I know if my starter is too acidic without tasting it? The most reliable indicators are smell and appearance. An overly acidic starter will typically have a strong aroma of vinegar, acetone (nail polish remover), or sometimes even a sharp, cheesy smell. Visually, it might show dark hooch (liquid) on top, be sluggish to rise, or deflate very quickly after feeding. A healthy starter has a pleasant, yeasty, slightly sweet, and mildly tangy scent.
Is hooch always a sign of an acidic starter? Not necessarily, but it's a strong indicator of hunger, which often precedes or accompanies acidity. Hooch is alcohol produced by yeast when the starter runs out of food. If the hooch is clear and light, your starter is just hungry. If it's dark brown or black, or if there's a lot of it, it indicates severe hunger and likely an overly acidic environment. Pink or orange streaks in hooch are a sign of spoilage and mean you should discard and start fresh.
Can I use different flours for feeding to balance acidity? Yes, and it's a highly effective strategy! Feeding with a blend of flours, such as mostly unbleached bread flour with a small percentage (e.g., 10-20%) of whole rye or whole wheat flour, can provide a balanced nutrient profile. Whole grains offer more nutrients for the microbes, while white flour can help dilute the acidity. Experimenting with different flour combinations can significantly impact the flavor and acidity profile of your starter.
How often should I discard? Discarding is crucial for managing starter volume and maintaining a healthy, non-acidic culture. If you're feeding daily at room temperature, you should discard most of your starter, leaving only a small amount (e.g., 10-20g) to feed. If you're storing it in the fridge and feeding weekly, you'll discard heavily before its weekly refresh. The goal is to always feed a small amount of starter with a generous amount of fresh food, preventing the accumulation of old, acidic culture.
Key Takeaways and Final Thoughts
Mastering your sourdough starter, particularly in preventing it from becoming overly acidic, is a journey that combines scientific understanding with intuitive observation. It's about nurturing a living culture, not just following a recipe. By understanding the 'why' behind the 'how,' you gain the confidence to adapt and troubleshoot.
- Control Temperature: Find the 'Goldilocks Zone' (22-24°C) to foster balanced microbial activity.
- Optimize Feeding Ratios: Use higher ratios (1:2:2 or 1:3:3) to dilute acidity and extend feeding windows.
- Master Timing: Feed your starter at or just after its peak to prevent it from becoming overly hungry and acidic.
- Balance Hydration & Flour: Aim for 100% hydration and consider a blend of flours to promote a milder tang.
- Don't Fear the Rescue: Utilize heavy discarding and generous feeding to revive an overly sour starter.
- Be Consistent & Observant: Regular maintenance and paying attention to your starter's cues are your best defense against acidity.
Remember, every starter is unique, influenced by its environment and your care. Embrace the process, observe diligently, and don't be afraid to experiment. With these expert strategies, you're now equipped to cultivate a vibrant, perfectly balanced sourdough starter that will elevate your baking to new, delicious heights. Happy baking!
Recommended Reading
- Unlock Culinary Freedom: 7 Steps to a Minimalist Pantry for Max Flexibility
- 5 Reasons Your Commercial Sourdough Starter Fails + How to Revive It
- Grill Master's 7 Steps: Stop Delicate Fish Flaking on High Heat
- 7 Pro Strategies: Prevent Oven-Baked One-Pot Chicken from Drying in Bulk
- Solved: Why Your One-Pot Pasta Bake Lacks Flavor & 7 Pro Fixes






0 Comentários: